Labels

Wednesday, May 2, 2018

What Is Puppet?

What Is Puppet?

Puppet is a Configuration Management tool that is used for deploying, configuring and managing servers. It performs the following functions:
  • Defining distinct configurations for each and every host, and continuously checking and confirming whether the required configuration is in place and is not altered (if altered Puppet will revert back to the required configuration) on the host.
  • Dynamic scaling-up and scaling-down of machines.
  • Providing control over all your configured machines, so a centralized (master-server or repo-based) change gets propagated to all, automatically.
Puppet uses a Master Slave architecture in which the Master and Slave communicate through a secure encrypted channel with the help of SSL. Puppet architecture is explained in detail in my Puppet Tutorial blog.
Check out this video on Puppet for better understanding. 


Now that you know what is Puppet, let us understand the reasons behind the popularity of Puppet.

What Is Puppet – Key Metrics

Below are few facts about Puppet:
  • Large installed base: Puppet is used by more than 30,000 companies worldwide including Google, Red Hat, Siemens, etc. along with several universities like Stanford and Harvard law school. An average of 22 new organizations per day use Puppet for the first time.
  • Large developer base: Puppet is so widely used that lots of people develop for it. Puppet has many contributors to its core source code.
  • Long commercial track record: Puppet has been in commercial use since 2005, and has been continually refined and improved. It has been deployed in very large infrastructures (5,000+ machines) and the performance and scalability lessons learned from these projects have contributed in Puppet’s development.
  • Documentation: Puppet has a large user-maintained wiki with hundreds of pages of documentation and comprehensive references for both the language and its resource types. In addition, it’s actively discussed on several mailing lists and has a very popular IRC channel, so whatever your Puppet problem, it’s easy to find the answer.
  • Platform support: Puppet Server can run on any platform that supports ruby for ex: CentOS, Microsoft Windows Server, Oracle Enterprise Linux etc. It not only supports the new operating systems but it can also run on relatively old and out-of-date OS and Ruby versions as well.
It is now evident that Puppet has huge demand globally. But, before diving deep into Puppet, it’s only fair that I first explain what is Configuration Management and why it is important. 

Configuration Management

System Administrators usually perform repetitive tasks such as installing servers, configuring those servers, etc. They can automate this task, by writing scripts, but it is a very hectic job when you are working on a large infrastructure.
To solve this problem, Configuration Management was introduced. Configuration Management is the practice of handling changes systematically so that a system maintains its integrity over time. Configuration Management (CM) ensures that the current design and build state of the system is known, good & trusted; and doesn’t rely on the tacit knowledge of the development team. It allows access to an accurate historical record of system state for project management and audit purposes. Configuration Management overcame the following challenges:
  • Figuring out which components to change when requirements change.
  • Redoing an implementation because the requirements have changed since the last implementation.
  • Reverting to a previous version of the component if you have replaced with a new but flawed version.
  • Replacing the wrong component because you couldn’t accurately determine which component needed replacing.
Let us understand its importance through a use case.
The best example I know is of the New York Stock Exchange (NYSE). A software “glitch” prevented the NYSE from trading stocks for almost 90 minutes. This led to millions of dollars of loss. A new software installation caused the problem. That software was installed on 8 of its 20 trading terminals and the system was tested out the night before. However, in the morning, it failed to operate properly on the 8 terminals. So there was a need to switch back to the old software. You might think that this was a failure of NYSE’s Configuration Management process, but in reality it was a success. As a result of a proper Configuration Management process, NYSE recovered from that situation in 90 minutes which was pretty fast. Had the problem continued longer, the consequences would have been more severe.
 Configuration Management at NYSE - What is Puppet - Edureka
Now, I hope you know the importance of Configuration Management. Configuration Management stage can be considered as the backbone of DevOps. It allows more frequent software releases in the safest and most reliable way possible.
Next, let us see some applications of Puppet.

What Is Puppet – Applications Of Puppet

Let us understand the applications of Puppet using a case study. If you are a poker enthusiast or if you have ever played online games, then you must have heard about Zynga. It is the world’s largest social game developer. Zynga’s infrastructure uses tens of thousands of servers in both public cloud and private data centers. Early on they were using a manual process, including kickstarters and post installs to get hundreds of servers online.
Now, we will see what problems they faced with this process:
  • Scalability & Consistency – Zynga was experiencing phenomenal growth and its infrastructure needed to keep pace with the industry. Script-based solutions and manual approaches were not sufficient for their needs.
  • Portable Infrastructure – Zynga needed a way to leverage a consistent configuration management approach in both their public cloud infrastructure and their own data centers.
  • Flexibility – Given the diversity of the various Zynga gaming properties, it was important for the team to be able to quickly match the right configuration for the right machine.
  • Infrastructure Insights – As the organization matured, it became more important to have an automated method of visualizing the properties of each machine.
The company was smart enough to quickly realize the need for an automated process even before they hit rapid scaling, that’s when Puppet came into the picture. Let us understand how Puppet contributes to their organization.
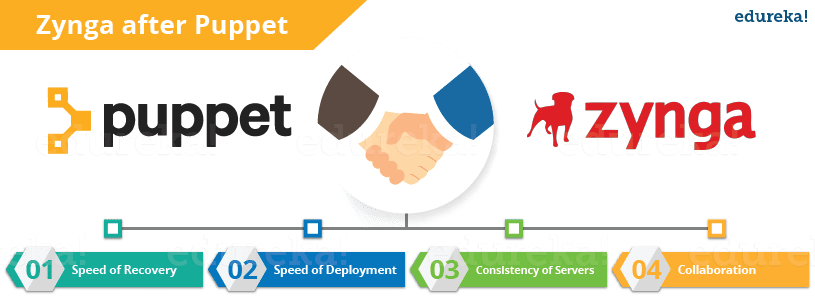
 Zynga After Puppet - What is Puppet - Edureka
  • Speed of Recovery – The production operations team can rapidly deploy the right configuration to the right box. If a system gets inappropriately reconfigured Puppet will automatically revert it back to a last stable stateor provide the details necessary to manually remediate a system rapidly.
  • Speed of Deployment – Puppet has provided significant time savings in the way the operations team delivers services for the gaming studios.
  • Consistency of Servers – Puppet’s model-driven framework ensures consistent deployments. According to Mark Stockford, Vice President Production Operations, Zynga “It is evident that we have experienced time savings. The beauty of using Puppet is that it allows us to deliver consistent configurations across our servers in a short period every time.”
  • Collaboration – Having a model-driven approach makes it easy to share configurations across the organization, enabling developers and operations teams to work together to ensure new service delivery is of extremely high quality. Over a dozen people from Zynga’s team got trained in Puppet. This knowledge has been disseminated throughout the team and to the operations teams within each individual gaming studio.
After What is Puppet blog, click here to visit my next blog on Puppet Tutorial which will include Puppet architecture and, components of Puppet. I will also explain steps to deploy MySQL and PHP using Puppet. Puppet is the most widely used tool to achieve DevOps in organizations with large infrastructure.

Puppet Tutorial

Puppet Tutorial

Puppet Tutorial is the second blog of Puppet blog series. I hope you have read my previous blog on “What is Puppet” that explains Configuration Management and why it is important with the help of use-cases.
In this Puppet Tutorial following topics will be covered:

What is Configuration Management?

In my previous blog, I have given an introduction to Configuration Management and what challenges it helps us to overcome. In this Puppet Tutorial, I will explain you about different interdependent activities of Configuration Management. But before that, let us understand what is Configuration Item (CI). A Configuration Item is any service component, infrastructure element, or other item that needs to be managed in order to ensure the successful delivery of services. Examples of CI include individual requirements documents, software, models, and plans.
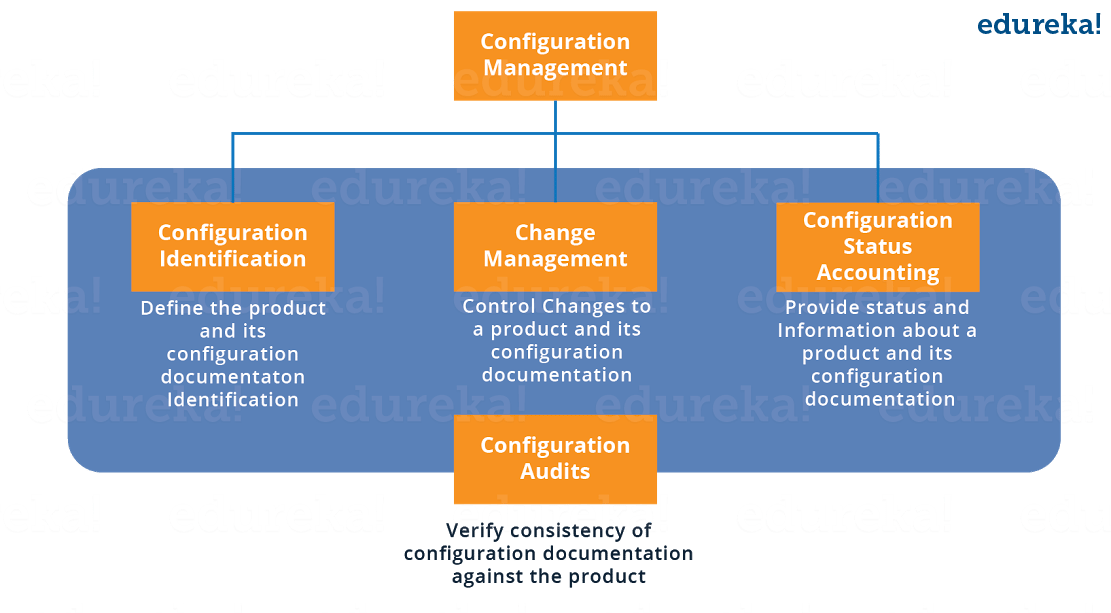
Configuration Management consists of the following elements:
  • Configuration Identification
  • Change Management
  • Configuration Status Accounting
  • Configuration Audits
The diagram below explains these components:
Configuration Management Components - Puppet Tutorial - Edureka
Configuration Identification: It is the process of:
  • Labeling software and hardware configuration items with unique identifiers
  • Identifying the documentation that describes a configuration item
  • Grouping related configuration items into baselines
  • Labeling revisions to configuration items and baselines.
Change Management: It is a systematic approach to dealing with change both from the perspective of an organization and the individual.
Configuration Status Accounting: It includes the process of recording and reporting configuration item descriptions (e.g., hardware, software, firmware, etc.) and all departures from the baseline during design and production. In the event of suspected problems, the verification of baseline configuration and approved modifications can be quickly determined.
Configuration Audits: Configuration audits provide a mechanism for determining the degree to which the current state of the system is consistent with the latest baseline and documentation. Basically, it is a formal review to verify that the product being delivered will work as advertised, promoted or in any way promised to the customers. It uses the information available as an outcome of the quality audits and testing along with the configuration status accounting information, to provide assurance that what was required has been build.
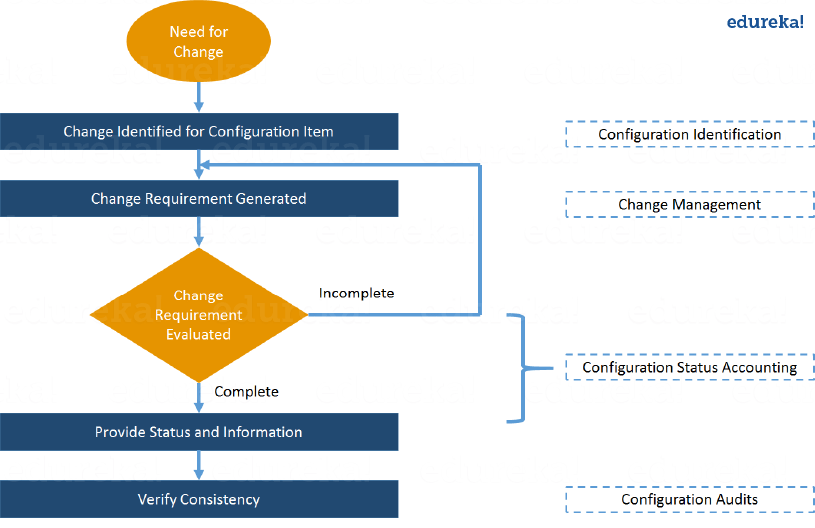
Let us understand Configuration Management with a use-case. Suppose if you have to update a particular software or you want to replace it, In that case the below flowchart should be followed for successful Configuration Management:
 Change Management - Puppet Tutorial - Edureka
Now is the correct time to understand Puppet Architecture.

Puppet Tutorial – Architecture of Puppet

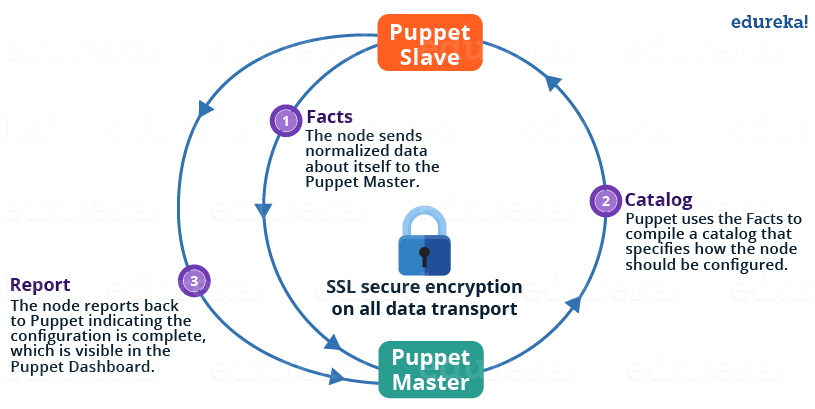
Puppet uses a Master-Slave architecture. The diagram below depicts the same:
Puppet Master Slave Architecture - Puppet Tutorial - Edureka
The following functions are performed in the above image:
  • The Puppet Agent sends the Facts to the Puppet Master. Facts are basically key/value data pair that represents some aspect of Slave state, such as its IP address, up-time, operating system, or whether it’s a virtual machine. I will explain Facts in detail later in the blog.
  • Puppet Master uses the facts to compile a Catalog that defines how the Slave should be configured. Catalog is a document that describes the desired state for each resource that Puppet Master manages on a Slave. I will explain catalogs and resources in detail later.
  • Puppet Slave reports back to Master indicating that Configuration is complete, which is visible in the Puppet dashboard.
Check out this Puppet tutorial video for deep understanding of Puppet.

Puppet Tutorial for Beginners | DevOps Training | Edureka

Puppet Tutorial – Puppet Master and Slave Communication

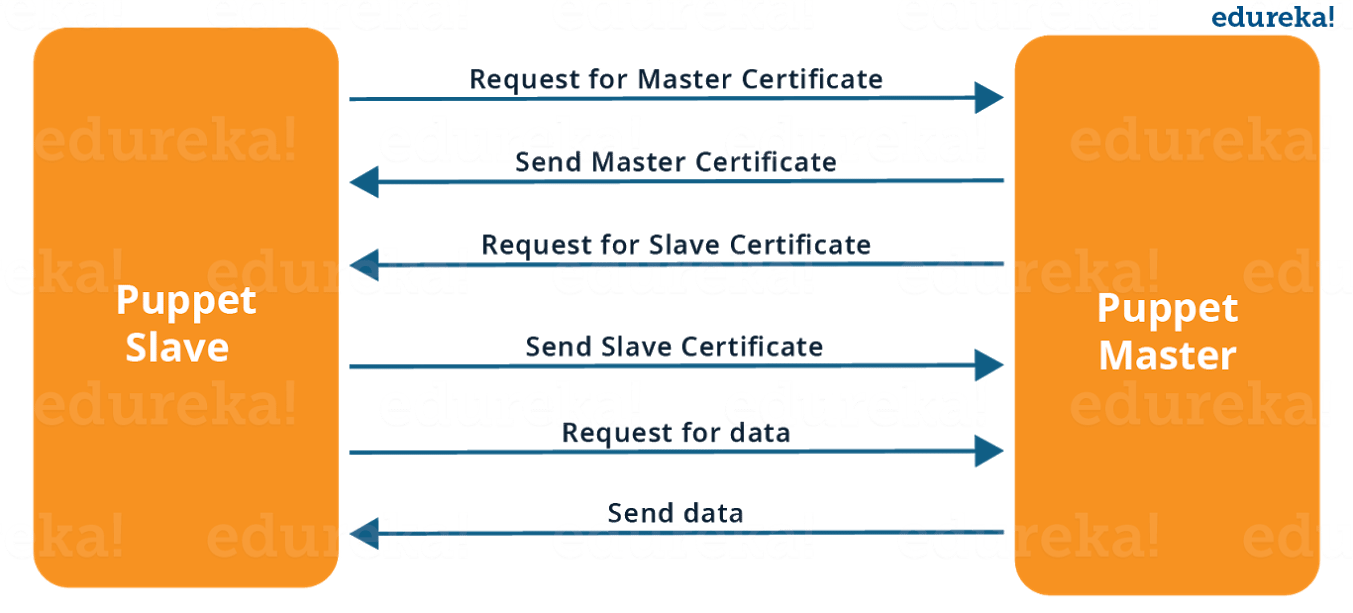
Puppet Master and Slave communicates through a secure encrypted channel with the help of SSL. The diagram below depicts the same:
 SSL Connection Between Puppet Master and Puppet Slave - What is Puppet - Edureka
As you can see from the above Image:
  • Puppet Slave asks for Puppet Master certificate.
  • After receiving Puppet Master certificate, Master requests for Slave certificate.
  • Once Master has signed the Slave certificate, Slave requests for configuration/data.
  • Finally, Puppet Master will send the configuration to Puppet Slave.
Let us now have a look at various Puppet components.

Puppet Tutorial – Components of Puppet

Manifests: Every Slave has got its configuration details in Puppet Master, written in the native Puppet language. These details are written in the language which Puppet can understand and are termed as Manifests. They are composed of Puppet code and their filenames use the .pp extension. These are basically Puppet programs. 
For example: You can write a Manifest in Puppet Master that creates a file and installs Apache server on all Puppet Slaves connected to the Puppet Master.
Module: A Puppet Module is a collection of Manifests and data (such as facts, files, and templates), and they have a specific directory structure. Modules are useful for organizing your Puppet code, because they allow you to split your code into multiple Manifests. Modules are self-contained bundles of code and data.
Resource: Resources are the fundamental unit for modeling system configurations. Each Resource describes some aspect of a system, like a specific service or package.
Facter: Facter gathers basic information (facts) about Puppet Slave such as hardware details, network settings, OS type and version, IP addresses, MAC addresses, SSH keys, and more. These facts are then made available in Puppet Master’s Manifests as variables.
Mcollective: It is a framework that allows several jobs to be executed in parallel on multiple Slaves. It performs various functions like:
  • Interact with clusters of Slaves, whether in small groups or very large deployments.
  • Use a broadcast paradigm to distribute requests. All Slaves receive all requests at the same time, requests have filters attached, and only Slaves matching the filter will act on requests.
  • Use simple command-line tools to call remote Slaves.
  • Write custom reports about your infrastructure.
Catalogs: A Catalog describes the desired state of each managed resource on a Slave. It is a compilation of all the resources that the Puppet Master applies to a given Slave, as well as the relationships between those resources. Catalogs are compiled by a Puppet Master from Manifests and Slave-provided data (such as facts, certificates, and an environment if one is provided), as well as an optional external data (such as data from an external Slave classifier, exported resources, and functions). The Master then serves the compiled Catalog to the Slave when requested.
Now in this Puppet Tutorial my next section will focus on Hands-On.

Puppet Tutorial – Hands-On

I will show you how to deploy MySQL and PHP from Puppet Master to Puppet Slave. I am using only one Slave for demonstration purpose there can be hundreds of Slaves connected to one Master. To deploy PHP and MySQL I will use predefined modules available at forge.puppet.com. You can create your own modules as well.
Step 1: In Puppet Master install MySQL and PHP modules.
Execute this: 
1) puppet module install puppetlabs-mysql –version 3.10.0
This MySQL module installs, configures, and manages the MySQL service. This module manages both the installation and configuration of MySQL, as well as extending Puppet to allow management of MySQL resources, such as databases, users, and grants.
MySQL Module - Puppet Tutorial - Edureka
2) puppet module install mayflower-php –version 4.0.0-beta1
This module is used for managing PHP, in particular php-fpm. PHP-FPM (FastCGI Process Manager) is an alternative PHP FastCGI implementation with some additional features useful for sites of any size, especially busier sites.
PHP Module - Puppet Tutorial - Edureka
Step 2: In Puppet Manifests include MySQL server and PHP.
Execute this: vi /etc/puppet/manifests/site.pp
You can use any other editor as well like vim, gedit etc. In this site.pp file add the following:
1
2
include '::mysql::server'
include '::php'
Save and quit.
Step 3: Puppet Slaves pulls its configuration from the Master periodically (after every 30 minutes). It will evaluate the main manifest and apply the module that specifies MySQL and PHP setup. If you want to try it out immediately, you need to run the following command on every Slave node:
Execute this: puppet agent -t
Updated Puppet Agent - Puppet Tutorial - Edureka
So MySQL and PHP is installed successfully on the Slave node.
Step 4: To check the version of MySQL and PHP installed: 
Execute this:
1) mysql -v
MySQL Version - Puppet Tutorial - Edureka
2) php -version
PHP Version - Puppet Tutorial - Edureka
Congratulations! MySQl and PHP is up and running in your Puppet Slave. Here I have shown you only one Slave but imagine if there are hundreds of Slaves. In that scenario your work becomes so easy, Just specify the configurations in Puppet Master and Puppet Slaves will automatically evaluate the main manifest and apply the module that specifies MySQL and PHP setup.

Install Puppet

 Install Puppet

This blog is a guide on how to install Puppet Master and Puppet Agent (Slave) on a CentOS machine. We will also look at a Puppet example, in which I will deploy Apache Tomcat using Puppet. I am using two CentOS virtual images, one for Puppet Master and other for Puppet Agent.
Following are the steps to install Puppet:-
  1. Install Puppet Master and Puppet Agent
  2. Edit hosts and Puppet configuration files in Puppet Master and Agent
  3. Establish a Secure Connection between Puppet Master and Puppet Agent
  4. Deploy Apache Tomcat using Puppet
Before we install Puppet, Let us look at some prerequisites.

Prerequisites

I am using two virtual images, so you can select any one of them as Puppet Master and other can be termed as Puppet Agent.
First, we need to delete all firewall rules from Puppet Master and Puppet Agent. Iptables is the default firewall available in the most Linux distributions by default.
Execute this:
1
iptables -F
Now we need to save these configurations.
Execute this:
1
service iptables save
We need to enable the official Puppet Labs collection repository in both Puppet Master and Puppet Agent. To get this repository go to a link yum.puppetlabs.com.
Puppet Repository - Install Puppet - EdurekaHere, copy the link location of the repository according to the version of CentOS that you are using. I am using CentOS 6.
Now to get this repository, execute the below command in both the virtual images:
Execute this: 
1
rpm -ivh http://yum.puppetlabs.com/puppetlabs-release-el-6.noarch.rpm
Enable Puppet Repository - Install Puppet - Edureka
Puppet Slave Repository - Install Puppet - Edureka
We are done with the prerequisites, now before moving to Puppet installation, check out this Puppet installation video.


1. Install Puppet Master and Puppet Agent

1.1. Install Puppet Master

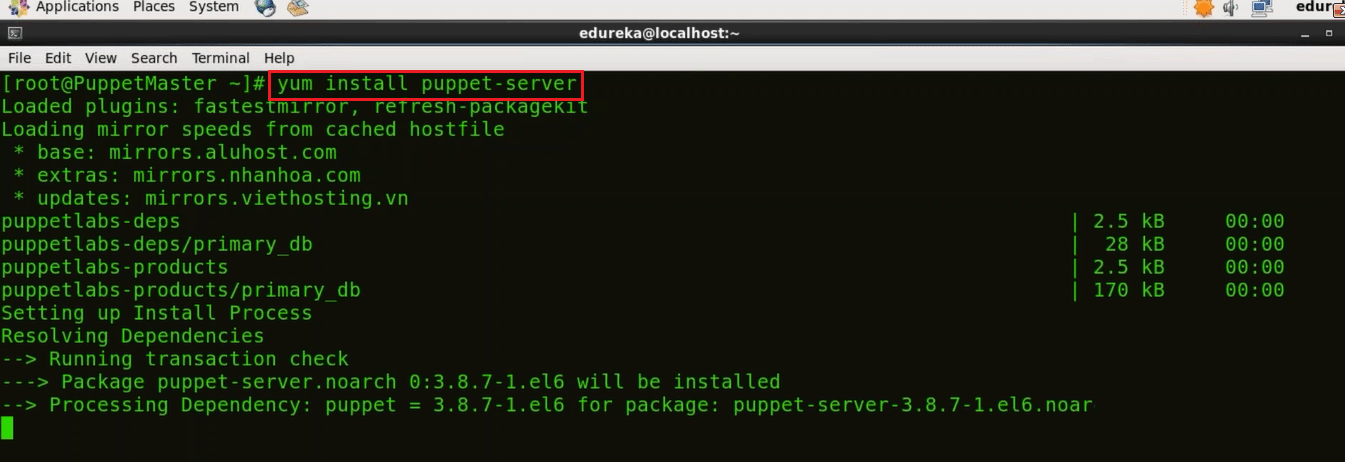
To install Puppet Master execute the below command:
Execute this (on master): 
1
yum install puppet-server
 Install Puppet Master - Install Puppet - Edureka

1.2. Install Puppet Agent

To Install Puppet Agent execute the below command:
Execute this (on agent): 
1
yum install puppet
Install Puppet Agent - Install Puppet - Edureka

2. Edit hosts and Puppet configuration files in Puppet Master and Agent

2.1. Edit hosts and Puppet configuration files in Puppet Master

First, in Puppet Master virtual image I will edit the hosts file using vi editor. You can use any other editor like vim, gedit etc. as well.
Execute this (on master):
1
vi /etc/hosts
Puppet Slave Hosts File - Install Puppet - Edureka
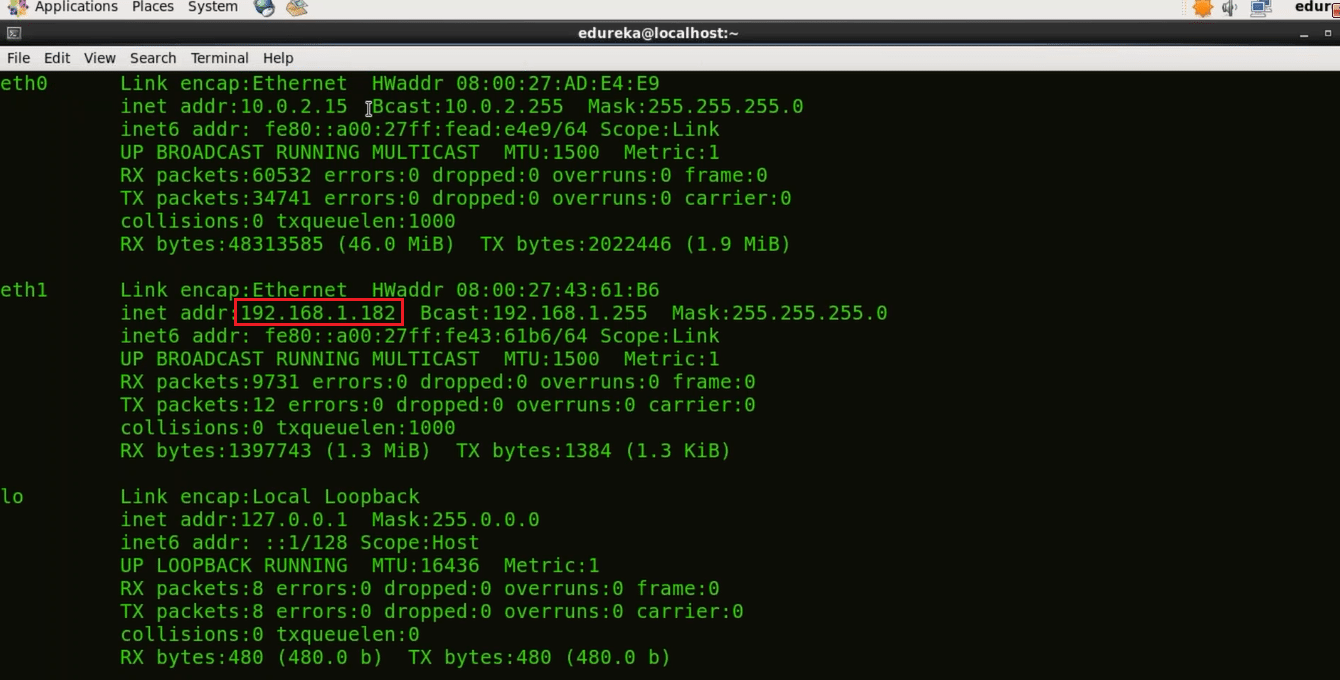
Just type the IP address of your machine and give a domain name to it. In the above screenshot you can see that 192.168.1.182 is the IP address of my machine and I have assigned it a domain name puppet puppet.edureka.co.
In order to know the IP address of your machine use the below command:
Execute this (on master):
1
ifconfig

IP Address Of The Machine - Install Puppet - Edureka
Now we will edit the Puppet configuration file, I will use vi editor.
Execute this (on master): 
1
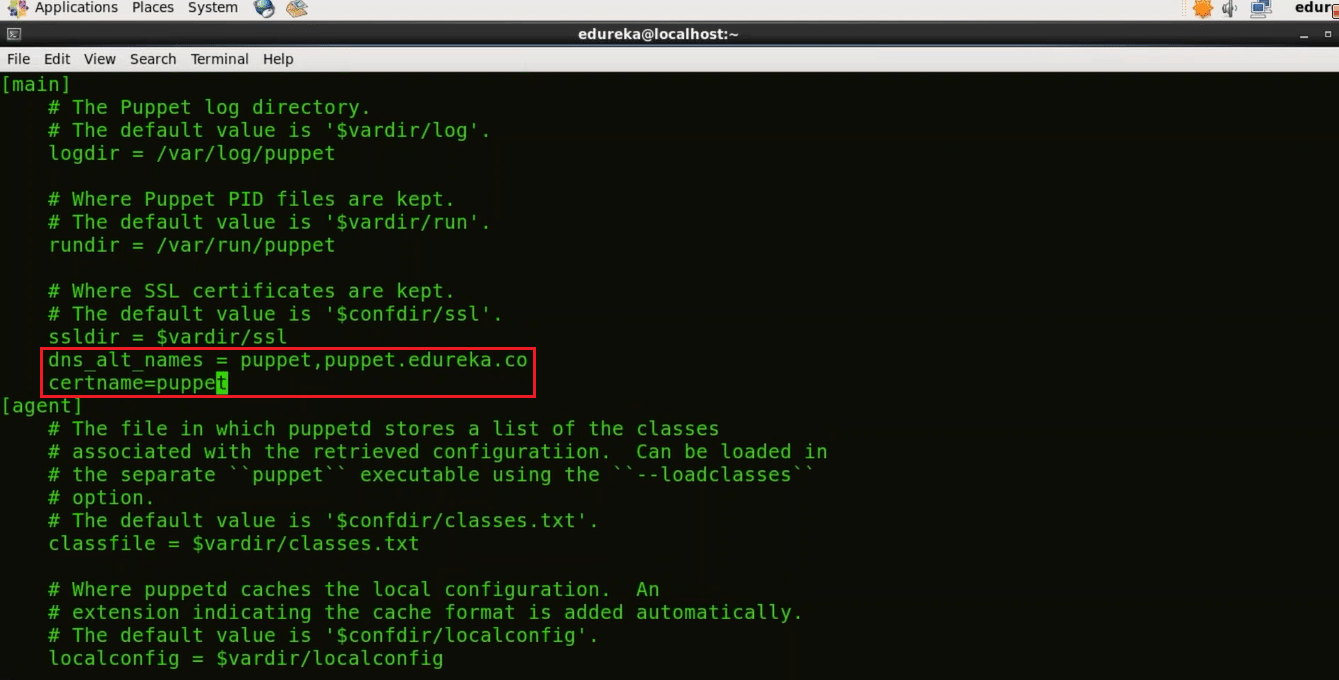
vi /etc/puppet/puppet.conf
Puppet Configuration File Puppet Master - Install Puppet - Edureka
Here in the Master section give the DNS name to which the server will respond to (type the domain name that you have given to your Puppet Master). DNS is an important element to ensure that nodes communicate using friendly names instead of IP addresses.
dns_alt_names = puppet,puppet.edureka.co
We need to give the certificate name as well
certname=puppet

2.2.Edit hosts and Puppet configuration files in Puppet Agent

Similar to Puppet Master here in the Puppet Agent virtual image we will first edit the hosts file by using vi editor.
Execute this (on agent): 
1
vi /etc/hosts
Puppet Agent Hosts File - Install Puppet - Edureka
Now type the IP address of your Puppet Agent and give a domain name to it, I have given ‘puppetagent’. You also need to give the IP address of your Puppet Master and the domain name attached to it.
192.168.1.119 puppetagent
192.168.1.182 puppet puppet.edureka.co
Let us now edit the Puppet configuration file.
Execute this (on agent):
1
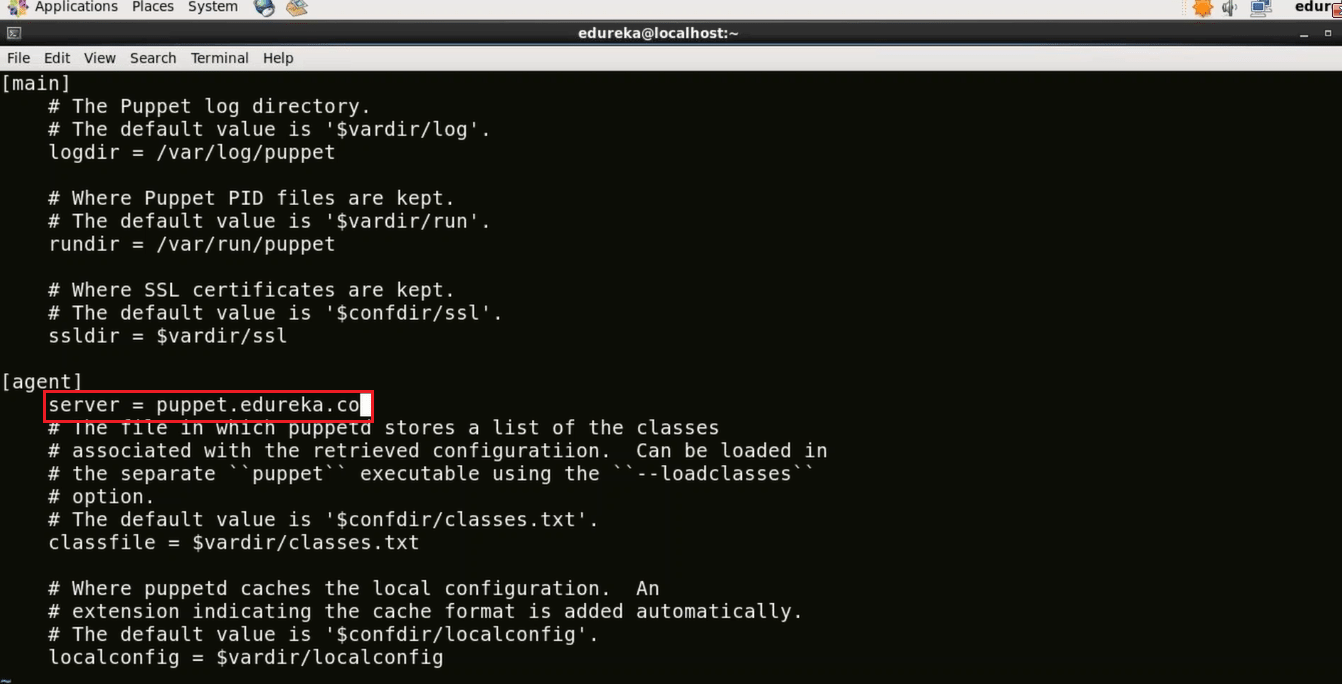
vi /etc/puppet/puppet.conf
 Puppet Configuration File Puppet Agent - Install Puppetr - Edureka
Now in the agent section assign the server name.
Type the domain name of your Puppet Master. This is a very important step because once you give the domain name it will go to the hosts file and check the IP address attached to that domain name. Make sure you have typed the correct domain name.
server = puppet.edureka.co

3. Establish A Secure Connection Between Puppet Master and Puppet Agent

Puppet Agent requests Puppet Master for its certificate. Once Puppet Master sends its certificate Puppet Agent generates its own certificate. It then requests the Puppet Master to sign this certificate. Once Master has signed this certificate there is a secure connection established between Puppet Master and Puppet Agent.

3.1. Generate Puppet Master Certificate

In Puppet Master virtual image, in order to generate CA certificate and Puppet Master certificate in Puppet Master machine execute the below command:
Execute this (on master): 
1
sudo -u puppet puppet master --no-daemonize --verbose
This command will create the CA certificate and a Puppet Master certificate, with the appropriate DNS names included. Stop It once the version of Puppet is displayed by using ctrl+c because we cannot start the Puppet Master right now.
Puppet Master Certificate - Install Puppet - Edureka
Now I will start Puppet Master.
Execute this (on master): 
1
puppet resource service puppetmaster ensure=running
Start Puppet - Install Puppet - Edureka

3.2. Send Certificate signing request from Puppet Agent to Puppet Master

Here in Puppet Agent virtual image, I need to send the certificate signing request to Puppet Master.
Execute this (on agent): 
1
puppet agent -t
Certificate Signing Request - Install Puppet - Edureka

3.3. Sign Puppet Agent Certificate in Puppet Master

In Puppet Master virtual image, we need to sign the certificate requested by Puppet Agent. In order to get the list of certificates execute the below command:
Execute this (on master): 
1
puppet cert list
Puppet certificates - Install Puppet - Edureka
As you can see that there is a certificate signing request pending by the name puppetagent. In order to sign that certificate execute the below command:
Execute this (on master): 
1
puppet cert sign puppetagent
Sign Puppet Agent Certificate - Install Puppet - Edureka
Here the certificate signing request was sent by Puppet Agent so I have signed that particular certificate, refer the screenshot above.

3.4. Update Puppet Agent

First, we need to start the Puppet Agent.
Execute this (on agent): 
1
puppet resource service puppet ensure=running
Start Puppet Agent - Install Puppet - Edureka
Now we need to update the Puppet Agent with the changes made in the Puppet Master. Since the Master has recently signed the certificate so it will update that.
Execute this (on agent): 
1
puppet agent -t
Puppet Agent Update - Install Puppet - Edureka
Congratulations! Now there is a secure connection between Puppet Master and Puppet Agent. Let us now see a Puppet example, in which I will deploy Apache Tomcat using Puppet.

4. Deploy Apache Tomcat using Puppet

4.1. Define Configuration In Puppet Master

In Puppet Master virtual image, before installing Tomcat 9, I need to install Java 8 because Tomcat 9 is only compatible with Java 8 or versions of Java released after Java 8.

4.1.1. Install Java and Tomcat Module

To install Java I need to install Java module, this module automatically installs Java JDK and simplifies the installation of Java using Puppet.
Execute this (on master): 
1
puppet module install puppetlabs-java
This command will install the latest compatible version of Java module.
Java Module - Install Puppet - Edureka
Now, we will install the Tomcat module. It allows you to use Puppet to install Tomcat, manage its configuration files and deploy web apps to it.
To install latest compatible version of Tomcat Module:
Execute this (on master): 
1
puppet module install puppetlabs-tomcat
Tomcat Module - Install Puppet - Edureka

4.1.2. Edit site.pp File in Puppet Manifests

Edit site.pp file in Puppet Manifests using your favorite editor, I will use vi editor, to know more about Manifests refer my Puppet Tutorial blog.
Execute this (on master): 
1
vi /etc/puppet/manifests/site.pp
Here include the following:
1
2
3
4
5
6
7
8
9
10
class {  ‘java’ :
 package => ‘java-1.8.0-openjdk-devel’:
 }
 tomcat::install { ‘/opt/tomcat’:
 }
 tomcat::instance { ‘default’:
 catalana_home => ‘/opt/tomcat’,
 }
This is how site.pp file should look like:
Site.pp File For Tomcat - Install Puppet - Edureka
Save the file and quit from vi editor.

4.2. Update Puppet Agent

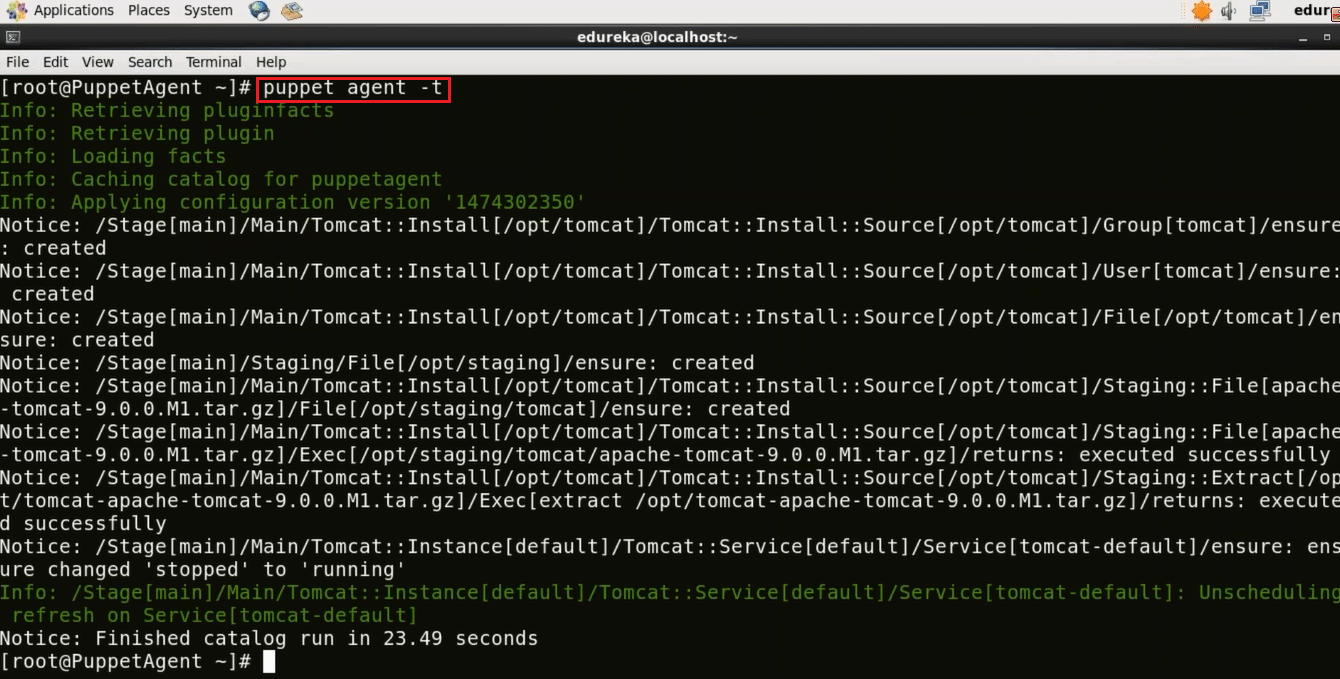
Puppet Agent pulls its configuration from the Master periodically (after every 30 minutes). It will evaluate the main manifest and apply the module that specifies Tomcat setup. If you want to try it out immediately, you need to run the following command on every Agent node:
Execute this (on agent): 
1
puppet agent -t
Updated Puppet Manifests - Install Puppet - Edureka
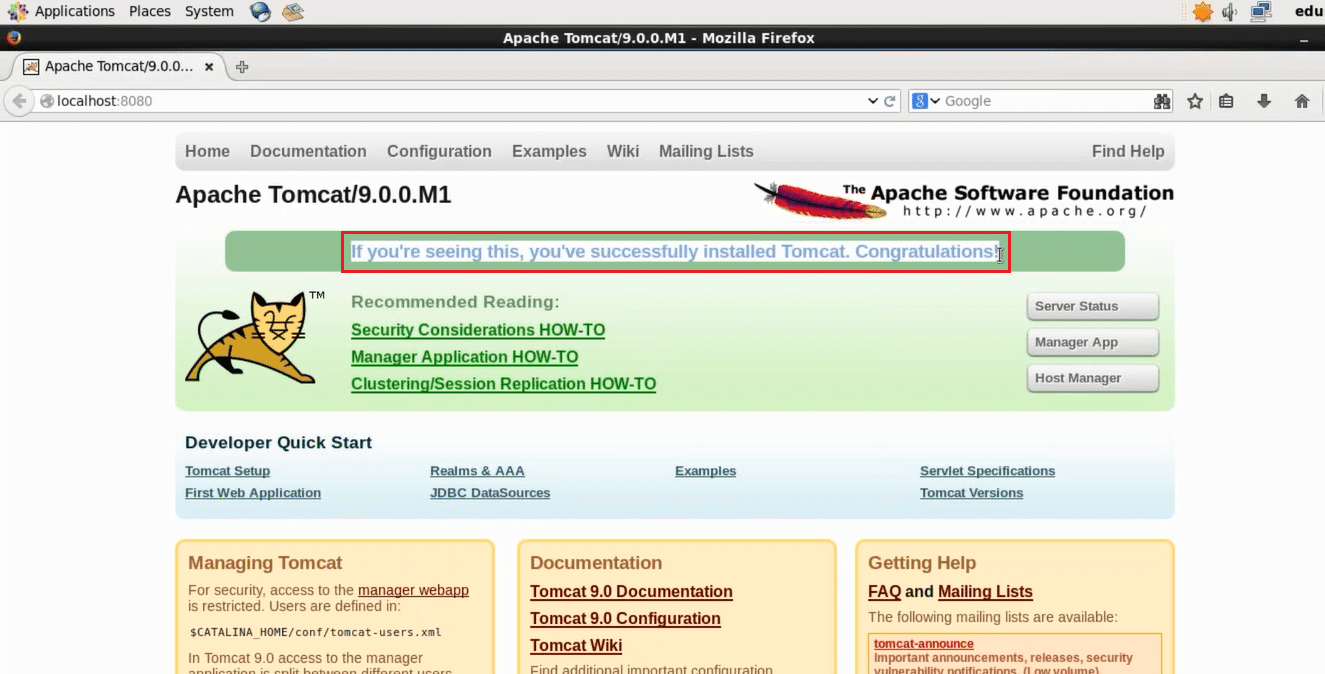
Let us see if Apache Tomcat is working in Puppet Agent. To confirm that open localhost:8080 in your browser on Puppet Agent virtual image (port 8080 is the default port for Apache Tomcat).
Apache Tomcat - Install Puppet - Edureka
We have successfully installed Apache Tomcat using Puppet. Similarly, large infrastructure with hundreds of Agents can be automatically managed using Puppet and plays a vital role in achieving DevOps.
Learn DevOps Now