Puppet Tutorial
Puppet Tutorial is the second blog of Puppet blog series. I hope you have read my previous blog on “What is Puppet” that explains Configuration Management and why it is important with the help of use-cases.
In this Puppet Tutorial following topics will be covered:
- What is Configuration Management?
- Puppet Architecture
- Puppet Master Slave Communication
- Puppet Components
- Hands-On
What is Configuration Management?
In my previous blog, I have given an introduction to Configuration Management and what challenges it helps us to overcome. In this Puppet Tutorial, I will explain you about different interdependent activities of Configuration Management. But before that, let us understand what is Configuration Item (CI). A Configuration Item is any service component, infrastructure element, or other item that needs to be managed in order to ensure the successful delivery of services. Examples of CI include individual requirements documents, software, models, and plans.
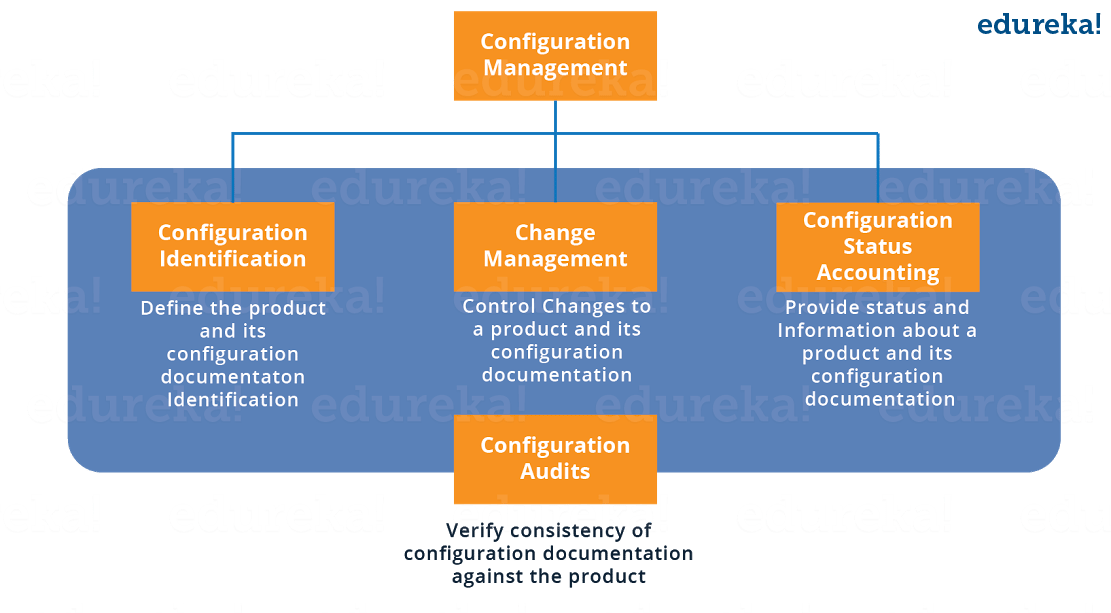
Configuration Management consists of the following elements:
- Configuration Identification
- Change Management
- Configuration Status Accounting
- Configuration Audits
The diagram below explains these components:

Configuration Identification: It is the process of:
- Labeling software and hardware configuration items with unique identifiers
- Identifying the documentation that describes a configuration item
- Grouping related configuration items into baselines
- Labeling revisions to configuration items and baselines.
Change Management: It is a systematic approach to dealing with change both from the perspective of an organization and the individual.
Configuration Status Accounting: It includes the process of recording and reporting configuration item descriptions (e.g., hardware, software, firmware, etc.) and all departures from the baseline during design and production. In the event of suspected problems, the verification of baseline configuration and approved modifications can be quickly determined.
Configuration Audits: Configuration audits provide a mechanism for determining the degree to which the current state of the system is consistent with the latest baseline and documentation. Basically, it is a formal review to verify that the product being delivered will work as advertised, promoted or in any way promised to the customers. It uses the information available as an outcome of the quality audits and testing along with the configuration status accounting information, to provide assurance that what was required has been build.
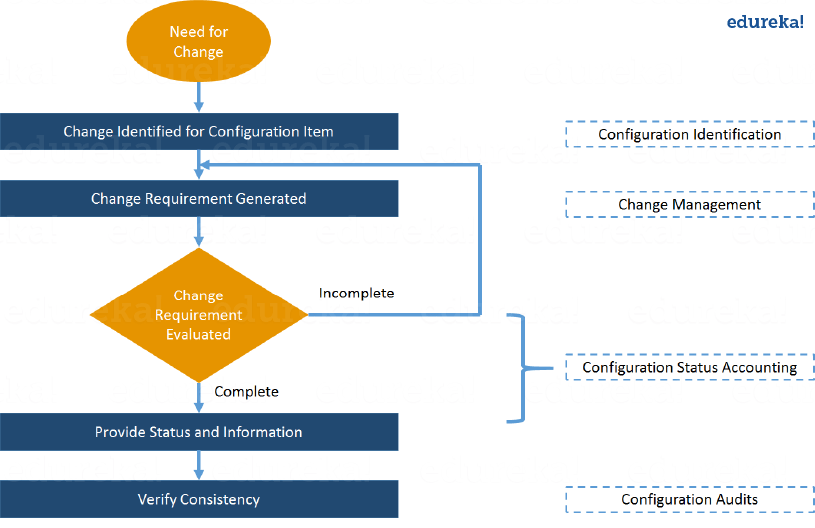
Let us understand Configuration Management with a use-case. Suppose if you have to update a particular software or you want to replace it, In that case the below flowchart should be followed for successful Configuration Management:

Puppet Tutorial – Architecture of Puppet
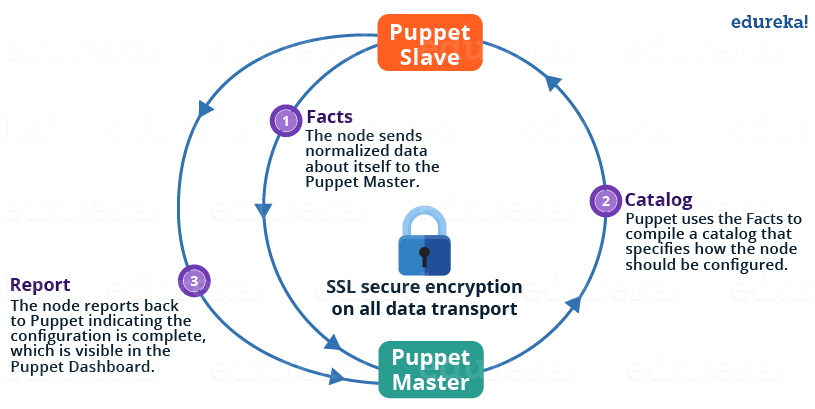
Puppet uses a Master-Slave architecture. The diagram below depicts the same:

The following functions are performed in the above image:
- The Puppet Agent sends the Facts to the Puppet Master. Facts are basically key/value data pair that represents some aspect of Slave state, such as its IP address, up-time, operating system, or whether it’s a virtual machine. I will explain Facts in detail later in the blog.
- Puppet Master uses the facts to compile a Catalog that defines how the Slave should be configured. Catalog is a document that describes the desired state for each resource that Puppet Master manages on a Slave. I will explain catalogs and resources in detail later.
- Puppet Slave reports back to Master indicating that Configuration is complete, which is visible in the Puppet dashboard.
Check out this Puppet tutorial video for deep understanding of Puppet.
Puppet Tutorial for Beginners | DevOps Training | Edureka
Puppet Tutorial – Puppet Master and Slave Communication
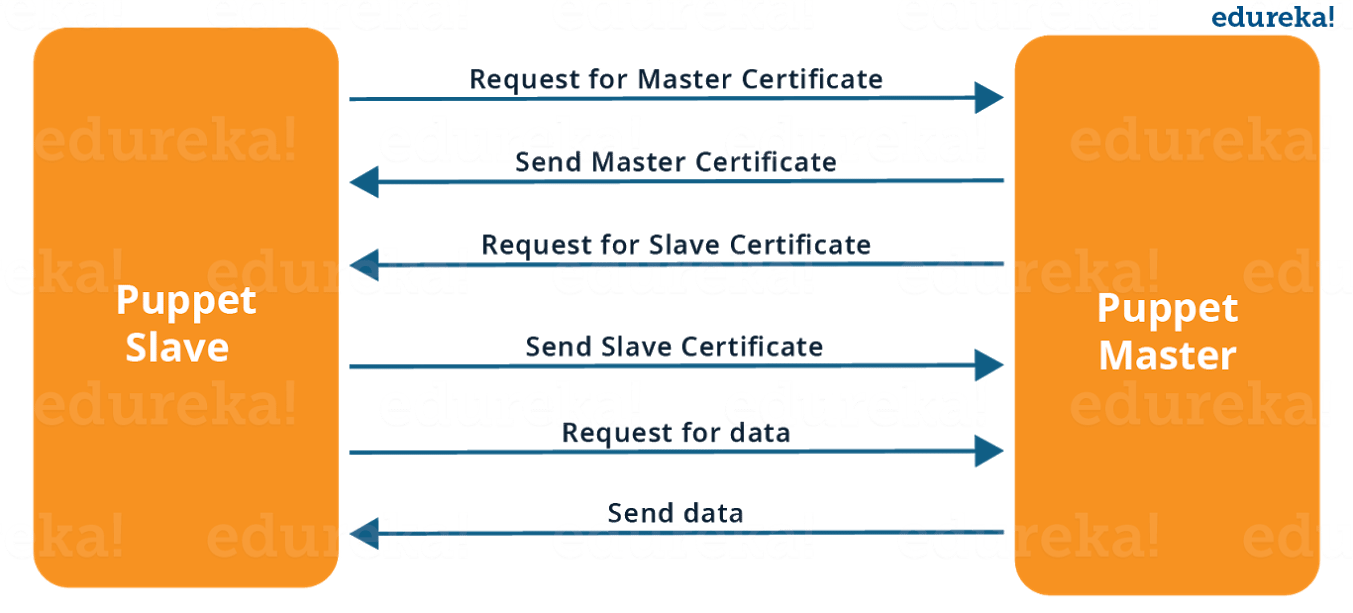
Puppet Master and Slave communicates through a secure encrypted channel with the help of SSL. The diagram below depicts the same:

As you can see from the above Image:
- Puppet Slave asks for Puppet Master certificate.
- After receiving Puppet Master certificate, Master requests for Slave certificate.
- Once Master has signed the Slave certificate, Slave requests for configuration/data.
- Finally, Puppet Master will send the configuration to Puppet Slave.
Puppet Tutorial – Components of Puppet
Manifests: Every Slave has got its configuration details in Puppet Master, written in the native Puppet language. These details are written in the language which Puppet can understand and are termed as Manifests. They are composed of Puppet code and their filenames use the .pp extension. These are basically Puppet programs.
For example: You can write a Manifest in Puppet Master that creates a file and installs Apache server on all Puppet Slaves connected to the Puppet Master.
For example: You can write a Manifest in Puppet Master that creates a file and installs Apache server on all Puppet Slaves connected to the Puppet Master.
Module: A Puppet Module is a collection of Manifests and data (such as facts, files, and templates), and they have a specific directory structure. Modules are useful for organizing your Puppet code, because they allow you to split your code into multiple Manifests. Modules are self-contained bundles of code and data.
Resource: Resources are the fundamental unit for modeling system configurations. Each Resource describes some aspect of a system, like a specific service or package.
Facter: Facter gathers basic information (facts) about Puppet Slave such as hardware details, network settings, OS type and version, IP addresses, MAC addresses, SSH keys, and more. These facts are then made available in Puppet Master’s Manifests as variables.
Mcollective: It is a framework that allows several jobs to be executed in parallel on multiple Slaves. It performs various functions like:
- Interact with clusters of Slaves, whether in small groups or very large deployments.
- Use a broadcast paradigm to distribute requests. All Slaves receive all requests at the same time, requests have filters attached, and only Slaves matching the filter will act on requests.
- Use simple command-line tools to call remote Slaves.
- Write custom reports about your infrastructure.
Catalogs: A Catalog describes the desired state of each managed resource on a Slave. It is a compilation of all the resources that the Puppet Master applies to a given Slave, as well as the relationships between those resources. Catalogs are compiled by a Puppet Master from Manifests and Slave-provided data (such as facts, certificates, and an environment if one is provided), as well as an optional external data (such as data from an external Slave classifier, exported resources, and functions). The Master then serves the compiled Catalog to the Slave when requested.
Now in this Puppet Tutorial my next section will focus on Hands-On.
Puppet Tutorial – Hands-On
I will show you how to deploy MySQL and PHP from Puppet Master to Puppet Slave. I am using only one Slave for demonstration purpose there can be hundreds of Slaves connected to one Master. To deploy PHP and MySQL I will use predefined modules available at forge.puppet.com. You can create your own modules as well.
Step 1: In Puppet Master install MySQL and PHP modules.
Execute this:
1) puppet module install puppetlabs-mysql –version 3.10.0
This MySQL module installs, configures, and manages the MySQL service. This module manages both the installation and configuration of MySQL, as well as extending Puppet to allow management of MySQL resources, such as databases, users, and grants.

2) puppet module install mayflower-php –version 4.0.0-beta1
This module is used for managing PHP, in particular php-fpm. PHP-FPM (FastCGI Process Manager) is an alternative PHP FastCGI implementation with some additional features useful for sites of any size, especially busier sites.

Step 2: In Puppet Manifests include MySQL server and PHP.
Execute this: vi /etc/puppet/manifests/site.pp
You can use any other editor as well like vim, gedit etc. In this site.pp file add the following:
1
2
| include '::mysql::server'include '::php' |
Save and quit.
Step 3: Puppet Slaves pulls its configuration from the Master periodically (after every 30 minutes). It will evaluate the main manifest and apply the module that specifies MySQL and PHP setup. If you want to try it out immediately, you need to run the following command on every Slave node:
Execute this: puppet agent -t

So MySQL and PHP is installed successfully on the Slave node.
Step 4: To check the version of MySQL and PHP installed:
Execute this:
1) mysql -v

2) php -version

Congratulations! MySQl and PHP is up and running in your Puppet Slave. Here I have shown you only one Slave but imagine if there are hundreds of Slaves. In that scenario your work becomes so easy, Just specify the configurations in Puppet Master and Puppet Slaves will automatically evaluate the main manifest and apply the module that specifies MySQL and PHP setup.

dewa 99
ReplyDeletelink dewa poker
situs poker online paling bagus
istana poker
situs qq
capsa susun for pc
cc poker
domino qq online
iblis poker
agen judi terpercaya
download capsa susun
www.dewapoker.com
login agen bni
lexus poker
situs poker bri online 24 jam
qqdewa link alternatif
dewapoker asia
judi qq online
Great post very useful info thanks for this post ....
ReplyDeleteAws training chennai | AWS course in chennai
RPA Training in Chennai
Appreciating the persistence you put into your blog and detailed information you provide.
ReplyDeleteBig data training in chennai
Your post is very great.I read this post. It's very helpful. I will definitely go ahead and Your post is very great.I read this post. It's very helpful. I will definitely go ahead and take advantage of this. You absolutely have wonderful stories. Cheers for sharing with us your blog.
ReplyDeletePython training in Noida
http://trainingbasket.in
You readily explained every topic! Looking forward to reading more posts from your blog…this site is equally good, just check it out...check my post on university of tennessee enrollment
ReplyDelete